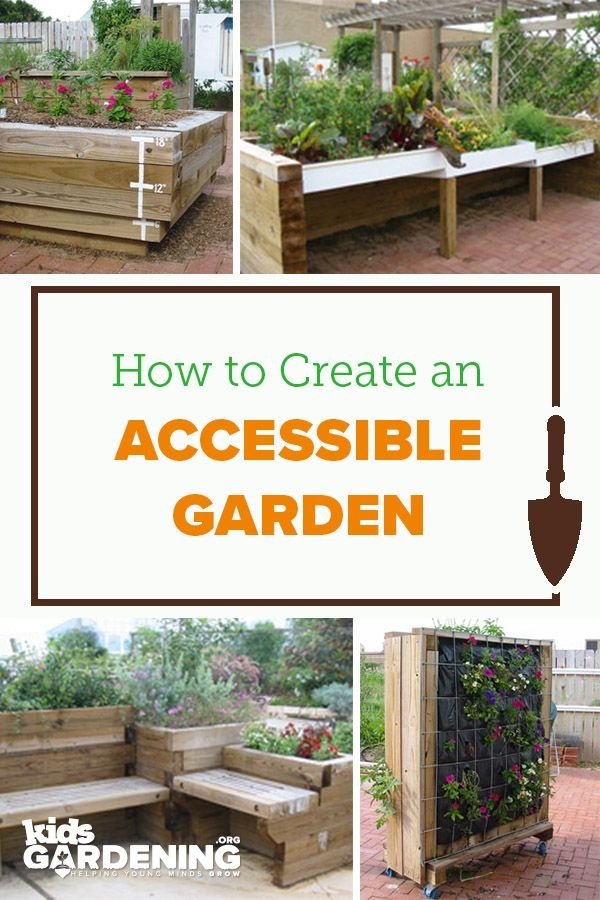
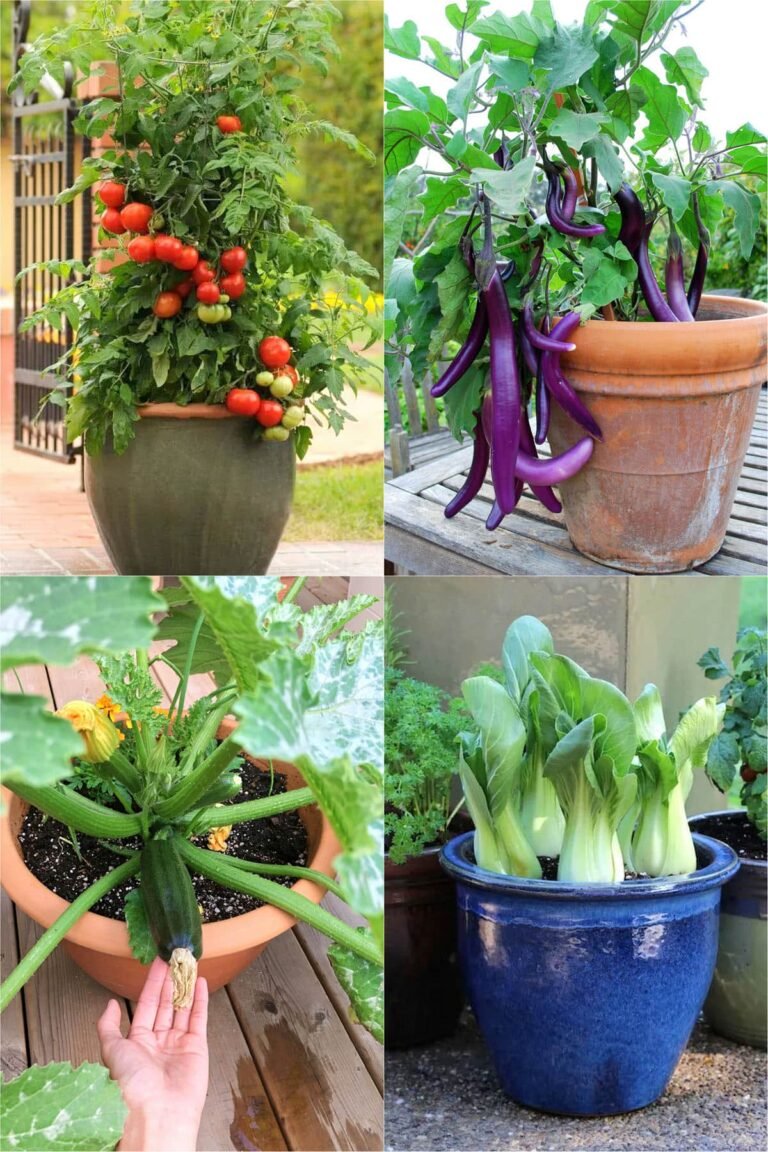
To make a wheelchair accessible garden, create firm, stable paths, provide enough room to turn, install raised planting beds, and place tools and plants within easy reach. Add safe entrances, comfortable seating, and reliable water access to make daily gardening easier.
Across the United States, home gardens, community plots, and backyard patios give people a place to grow food, enjoy nature, and spend time outdoors. A wheelchair should not prevent someone from planting tomatoes, tending flowers, or harvesting fresh herbs. With thoughtful planning, a garden can support different mobility needs without losing its beauty or charm.
The best accessible garden begins with the person who will use it. A manual wheelchair, a powered wheelchair, and a mobility scooter can have different space and turning needs. Hand strength, sitting height, reach, balance, and the type of gardening also affect the design. A useful garden makes routine tasks easier while reducing the need to stretch, bend, lift, or move across uneven ground.
You do not need to rebuild an entire yard to create a more accessible outdoor space. Start by removing the biggest barriers, such as loose gravel, narrow paths, high planting beds, and hard-to-reach water taps. Then improve the layout in stages. This approach can make the project more affordable and help you test each change before spending more money.
Source: images.dlf.org.uk
1. Assess Your Garden and the Gardener’s Needs
Begin by walking or rolling through the existing garden and noting where movement becomes difficult. Look for narrow entrances, steep slopes, loose stones, exposed roots, puddles, low branches, and steps. These obstacles can affect access even when the garden itself is attractive.
Ask the gardener which tasks matter most. One person may want a small vegetable plot, while another may prefer flowers, birdwatching, or container gardening. The layout should support these goals rather than force the gardener to work around a design that does not fit.
Measure the wheelchair’s width and length, including any footrests, hand rims, or accessories that affect clearance. If possible, test turning movements in the actual space. The manufacturer’s specifications can help, but real movement also depends on the surface, approach angle, and the user’s control of the chair.
Source: media.diyprojectsworld.com
Check the entrance
Measure gates and doorways, inspect thresholds, and confirm that the route from the home or driveway is wide enough for the wheelchair and any assistance needed.
Observe the ground
Identify muddy patches, loose gravel, slopes, cracks, and roots that may make rolling difficult or increase the risk of a fall or tip.
Plan around reach
Consider the gardener’s seated height, arm movement, hand strength, and ability to lean forward or reach sideways.
Set a practical budget
List essential changes first, such as path repairs and a suitable planting area. Add optional features, including decorative trellises and elaborate irrigation, later.
Choose the Main Gardening Activities First
Decide whether the garden will focus on growing food, maintaining flowers, raising seedlings, or enjoying a quiet outdoor space. A person who wants to grow vegetables may need deeper beds and room for harvesting containers. Someone who prefers herbs may need only a few accessible planters near a patio.
Choose a small number of daily tasks and make them easy to complete. Watering, pruning, harvesting, and storing tools should not require repeated trips across the yard. A compact design often works better than a large garden that demands more travel and upkeep.
For food gardening
Provide reachable beds for vegetables, herbs, and fruit plants, with a clear place to set a basket or container.
For flower gardening
Group plants by watering needs and choose a mix of colors, textures, and flowering times.
For low-maintenance gardening
Use containers, mulch where appropriate, perennial plants suited to the region, and accessible watering equipment.
2. Build Firm, Smooth, and Accessible Garden Paths
A stable path is one of the most useful features in a wheelchair accessible garden. It connects the entrance, planting beds, seating, and water source without forcing the gardener to roll through mud or loose soil. The surface should support the wheelchair, provide traction, and stay as even as practical.
Common path options include properly installed concrete, asphalt, compacted fine stone, and suitable outdoor paving systems. Each material has different costs, drainage needs, maintenance demands, and performance in local weather. The right choice depends on soil conditions, rainfall, freezing temperatures, available space, and the type of wheelchair.
Avoid assuming that every product described as accessible will work for every wheelchair. Loose pea gravel, deep bark chips, sand, and uneven stepping stones can make movement harder. Even compacted surfaces may develop ruts or become slippery if drainage and upkeep are poor.
The Americans with Disabilities Act Standards for Accessible Design provide technical requirements for many facilities covered by the ADA. They are not automatically a universal design code for every private backyard. Use the standards and applicable local rules when they apply, and consider a qualified accessibility professional when the garden has steep slopes, major level changes, or complex access needs.
Source: i.pinimg.com
Use a firm surface
Select a path material that resists sinking and rutting under the weight of the wheelchair. Check the surface after rain and after periods of heavy use.
Keep the route clear
Remove hoses, garden tools, low branches, and planters that reduce the usable path width or create trip hazards.
Manage drainage
Direct water away from the path and planting areas so the route does not become muddy, icy, or waterlogged.
Reduce sharp turns
Use gentle curves and open junctions where possible. Avoid forcing a wheelchair to turn tightly between pots or beds.
How Wide Should a Wheelchair Garden Path Be?
Path width should be based on the actual wheelchair, the user’s movement, and whether another person must walk beside or assist the gardener. A narrow route may be passable in a straight line but difficult to use when turning, passing another person, or approaching a raised bed.
For planning, the ADA standards commonly use a 36-inch minimum clear width for many accessible walking surfaces, with additional conditions for passing spaces and short restrictions. This is a useful reference point, not a guarantee that a garden path will suit every wheelchair or a statement that every private garden must follow that exact dimension. Wider paths often improve comfort and allow easier movement.
Measure the usable space after accounting for handrails, edging, plant growth, and other features. Test the narrowest point, the turn into the garden, and the approach to each bed before installing permanent paving.
For straight routes
Provide enough clear width for the wheelchair to move without brushing against walls, plants, or path edges.
For turning areas
Allow extra space at corners, gates, and bed ends. The required space varies with the wheelchair and the maneuver.
For shared routes
Consider a wider path if a caregiver, family member, or another garden visitor needs to walk beside the wheelchair.
Choose Materials That Suit Your Climate
Concrete can provide a firm, long-lasting route when installed with suitable drainage, joints, and surface texture. Pavers can work well if the base is properly prepared and the joints remain even. Compacted stone fines may cost less in some areas, but they require careful installation and maintenance to prevent loose material and ruts.
In regions with freeze-thaw cycles, poorly installed paving may heave or crack. In hot climates, dark paving can become uncomfortable under direct sunlight. In rainy regions, standing water and slippery growth may be greater concerns. Review local conditions before choosing a surface.
Concrete
Useful for a stable route, but professional installation may be needed to control slopes, drainage, joints, and surface finish.
Interlocking pavers
Can be repaired in sections, but uneven settlement or wide joints may obstruct wheels.
Compacted fine stone
May suit some gardens when installed with a stable base and proper compaction, but needs regular checks.
3. Install Raised Garden Beds at a Comfortable Height
Raised garden beds let wheelchair users reach soil and plants without working at ground level. They can reduce the need to bend and may make planting, weeding, and harvesting easier. However, a raised bed is only accessible when its height, depth, edge design, and approach space match the gardener’s body and wheelchair.
There is no single bed height that works for every person. Measure the gardener’s seated reach and test how far they can reach forward without discomfort or losing balance. A bed that is too high may make the far side inaccessible, while one that is too low can require excessive leaning.
A shallow bed with an open space underneath can let the wheelchair user move closer to the plants. This design may be especially useful for people who cannot comfortably reach across a wide planter. Ensure that the structure has adequate support and that its open space accommodates the chair’s footrests and leg position.
Use untreated wood suitable for outdoor construction, durable masonry, or other materials intended for garden beds. Choose soil that drains well and supports the selected plants. Before filling a large bed, consider the weight of wet soil and water, particularly if the structure sits on a deck, balcony, or raised platform.
Source: placerrcd.org
Match the bed to seated reach
Test the intended planting height and reach distance with the gardener sitting in their usual wheelchair position.
Provide knee and footrest clearance
If the design allows a chair to roll underneath, make sure the frame and supports do not block the user’s legs or footrests.
Keep beds within easy reach
Avoid wide beds that require the gardener to lean far forward or stretch across the soil.
Use safe, durable materials
Choose materials designed for outdoor use and ensure the frame can support the soil and water load.
Choose Between Raised Beds, Containers, and Vertical Planters
Raised beds work well for a dedicated vegetable or flower area. Containers offer more flexibility because they can be moved when the growing season changes, although heavy pots should not be moved by hand if doing so creates a risk. Vertical planters can make use of limited space, but the upper planting pockets must remain within comfortable reach.
A mix of these options can support different plants without making the garden harder to maintain. Place frequently harvested herbs near the entrance, larger crops in the main beds, and decorative plants in containers that do not narrow the path.
Raised beds
Best for gardeners who want a stable, dedicated growing area with a carefully chosen height and depth.
Containers
Useful for patios, small gardens, and seasonal planting, provided pots remain stable and reachable.
Vertical planters
Helpful where ground space is limited, but place plants at reachable levels rather than high overhead.
Plan for Soil, Water, and Drainage
Raised beds dry out at different rates depending on their depth, materials, sunlight, and local weather. Choose a soil mix suited to the crops and provide drainage that prevents water from pooling around roots. A reliable irrigation system can reduce the effort required to keep plants healthy.
If the bed sits on a deck, porch, or balcony, check the structure’s load capacity before adding wet soil and water. A licensed contractor or structural professional can assess uncertain load limits. Do not assume that a raised structure can safely support a heavy garden bed simply because it supports people.
Check water flow
Make sure excess water drains away from paths and does not create slippery or muddy access areas.
Reduce watering effort
Consider drip irrigation, a reachable hose connection, or an easy-to-operate watering wand.
Protect nearby surfaces
Use suitable liners and drainage details when needed, without blocking the bed’s intended drainage.
4. Make Garden Entrances, Ramps, and Gates Easier to Use
A garden is not truly accessible if the gardener cannot reach it safely from the house, driveway, or patio. Check every change in level between the starting point and the main planting area. Small thresholds, loose boards, steep slopes, and heavy gates can prevent independent access even when the paths and beds are well designed.
If a ramp is needed, its slope, width, landings, surface, edge protection, and handrails may affect safety. The correct design depends on the height difference, the wheelchair, the user’s abilities, and the rules that apply to the property. Do not choose a ramp by appearance alone or assume that a short, steep ramp is safe for a manual or powered wheelchair.
A qualified contractor or accessibility professional can help with complex level changes. For facilities covered by the ADA, applicable standards must be reviewed in context. For private homes, local building codes and other rules may still apply, especially when construction alters a deck, porch, retaining wall, or structural entrance.
Gates should open without excessive force and should not swing into the usable path in a way that traps or obstructs the wheelchair. A latch that can be reached and operated with limited hand strength can improve independence. Test the gate from the approach direction and from inside the garden.
Source: i.pinimg.com
Create a clear approach
Remove loose objects, repair uneven thresholds, and provide enough room to line up with the entrance.
Use a suitable ramp design
Have significant slopes or level changes assessed before construction. Include appropriate landings and edge protection where required.
Choose an easy-to-operate gate
Select a latch that the gardener can reach and use comfortably without twisting or leaning far.
Keep surfaces slip-resistant
Inspect entrance areas for wet leaves, algae, ice, loose boards, and other hazards that can reduce traction.
Test the Entrance Before Making It Permanent
Use temporary markers to outline the proposed entrance and turning area. Approach it from the same direction the gardener will use every day, then test opening the gate, crossing the threshold, and turning onto the path.
Check whether a helper must hold a door or gate while the wheelchair passes. If assistance is needed, consider whether a different hinge direction, lighter gate, or better landing could make the movement easier. Confirm that these changes do not create new hazards elsewhere.
Test the full movement
Include approaching, stopping, opening, passing through, closing, and turning away from the entrance.
Review drainage
Prevent rainwater from collecting at thresholds, ramp landings, and gate openings.
5. Arrange Plants, Tools, and Water Within Easy Reach
Place the plants and equipment used most often close to the gardener’s main work area. A well-planned layout reduces repeated travel and limits the need to reach across beds or lift heavy objects. Keep essential items in predictable locations so the gardener can find them without searching.
Store hand tools, gloves, labels, seed packets, and small containers on a stable shelf or work surface that can be reached while seated. Heavy soil bags and full watering cans can be difficult to lift, so consider smaller containers, wheeled carts that suit the path, or help with tasks that exceed the gardener’s safe lifting ability.
Water access deserves special attention. A long hose can cross a path and create a hazard, while a heavy hose reel may be hard to pull. A reachable faucet, suitable lightweight hose, drip line, or easy-to-operate watering wand can make routine care more manageable.
Choose tools based on the user’s grip, arm strength, and range of motion. Lightweight tools with padded handles may help some people, while long-handled tools may reduce bending but can be harder for others to control. Test a tool before buying several of the same type.
Source: i.pinimg.com
Create an accessible tool station
Use reachable shelves, clear labels, and a stable work surface near the main growing area.
Simplify watering
Consider drip irrigation, lightweight hoses, easy-grip controls, or a watering wand that does not require excessive force.
Choose suitable tools
Look for comfortable grips, manageable weight, and designs that suit the gardener’s actual movement and strength.
Keep paths free of equipment
Store hoses, carts, and tools off the main route when they are not in use.
Use a Wheelchair-Accessible Work Surface
A stable table or potting bench provides a place to fill pots, sort seeds, and prepare cuttings. Its height should match the gardener’s seated position, and the underside should allow comfortable knee and footrest clearance if the chair needs to roll beneath it.
Keep the most-used items close to the front of the surface. Avoid placing sharp tools at the edge, and secure the table so it does not shift when the gardener presses against it. If the work involves soil or water, choose a surface that can be cleaned without leaving slippery residue on the surrounding path.
Check seated clearance
Make sure the table legs and supports do not block the wheelchair’s footrests or the user’s knees.
Reduce reaching
Arrange supplies in a small, reachable work zone instead of spreading them across a large table.
Secure the work area
Use stable furniture and store sharp tools safely when the station is not in use.
6. Choose Plants That Are Easy to Grow and Maintain
Choose plants that fit the gardener’s interests, the local climate, and the time available for care. Low-maintenance plants can make gardening more enjoyable because they reduce repeated pruning, watering, and cleanup. The best options differ across the United States, from the hot, dry Southwest to humid Gulf Coast areas and cold northern states.
For a small accessible vegetable garden, consider crops that can be harvested often and grown in containers or raised beds. Lettuce, bush beans, radishes, compact tomatoes, and many herbs can suit different garden setups when the temperature, sunlight, and growing season are right. Check local planting calendars and select varieties suited to the region.
Native plants can support local wildlife and may need less extra watering once established, depending on the species and site. They are not automatically maintenance-free, and some still need pruning, seasonal care, or protection during establishment. Choose plants that will not grow into paths or block the gardener’s reach.
Avoid placing thorny plants, heavy hanging pots, or toxic plants where they create a hazard. Fragrant flowers, colorful foliage, and plants that attract birds and butterflies can make the garden more engaging without adding difficult tasks. Keep mature plant size in mind so that an accessible layout stays accessible as the garden grows.
Source: urban-earth.co.uk
Grow easy-to-reach herbs
Basil, parsley, chives, and other suitable herbs can thrive in reachable containers when their sunlight and water needs are met.
Choose compact crops
Look for varieties that fit the bed’s size and allow harvesting without leaning far over the soil.
Use region-appropriate plants
Check local extension service advice for planting dates, heat tolerance, water needs, and suitable native species.
Control mature growth
Place sprawling or thorny plants away from paths, turning areas, entrances, and work surfaces.
Make Seasonal Care Easier
Group plants with similar watering and sunlight needs. This makes irrigation easier to manage and reduces the chance that one part of the garden receives too much or too little water. Add mulch where suitable to help manage weeds and conserve moisture, keeping loose material away from the main wheelchair route.
Plan for seasonal changes before they become urgent. In colder areas, move suitable containers to sheltered locations or choose plants that tolerate local winter conditions. In hotter regions, provide shade where needed and avoid scheduling strenuous work during the hottest part of the day.
Group by water needs
Place plants with similar irrigation requirements together to simplify watering.
Plan for heat and cold
Use local climate guidance to select varieties and schedule planting and maintenance.
Limit weed growth
Use suitable mulch, close plant spacing where appropriate, and accessible tools to reduce repeated weeding.
7. Add Shade, Seating, and Comfortable Rest Areas
A comfortable rest area helps the gardener enjoy the space even when planting or watering becomes tiring. Provide a clear route to a shaded spot, and arrange seating so that wheelchair users can stay in their chairs or transfer to another seat if they choose. Do not make transferring necessary to enjoy the garden.
A tree, shade sail, canopy, or outdoor umbrella can provide relief from direct sun. Choose a design that does not obstruct the route, reduce turning space, or create a hazard in strong winds. In hot parts of the United States, shade and convenient drinking water can make outdoor time more comfortable.
Select outdoor furniture that remains stable on the chosen surface. Chairs should not slide when someone sits down or stands up, and tables should not block the path. If the gardener needs transfer support, consult an appropriate professional about the safest seating arrangement.
Consider the garden at different times of day. A shaded spot in the morning may be in full sun by late afternoon. Check how the sun moves across the property before placing the main seating area or choosing plants that need shade.
Source: i.pinimg.com
Provide shade
Use a suitable canopy, umbrella, or plant cover while keeping the access route open.
Keep seating close
Place a resting area near the main beds so the gardener can take breaks without a long trip.
Choose stable furniture
Use furniture that will not tip, slide, or narrow the route during everyday use.
Plan for comfort
Consider sun exposure, airflow, access to drinking water, and the user’s preferred way to rest.
Create a Garden That Can Be Enjoyed Without Physical Work
Gardening can include more than planting and pruning. A quiet place to watch pollinators, listen to birds, enjoy flowers, or sit outdoors can be a valuable part of the garden. Leave clear sightlines to interesting plants and use a range of textures and colors to create visual interest.
Place a few favorite plants near the seating area so that the garden remains rewarding even on days when the gardener has limited energy. A low-maintenance design should make it easy to enjoy the space without creating a new set of demanding chores.
Add sensory interest
Choose suitable fragrant herbs, colorful flowers, textured foliage, or plants that attract birds and butterflies.
Keep views open
Avoid tall containers or structures that block the view from a seated position.
8. Improve Safety Without Making the Garden Feel Clinical
A safe accessible garden should feel welcoming, not like a medical facility. Good design can reduce hazards through clear paths, suitable lighting, stable furniture, and smart storage while preserving the color and natural feel of an outdoor space.
Inspect the garden regularly for changes that may affect wheelchair movement. Plant roots can lift paving, rain can wash away path material, and branches can grow into turning areas. Check surfaces after storms and repair problems before they become difficult to navigate.
Lighting is useful near gates, steps, ramps, water sources, and storage areas. Use outdoor-rated fixtures installed according to manufacturer instructions and applicable electrical rules. Electrical work near irrigation or standing water may require a qualified electrician. Do not use extension cords across wheelchair routes as a permanent lighting solution.
Gardening also involves sun exposure, insects, sharp tools, and contact with soil. Use appropriate gloves and protective clothing, store tools securely, and follow label instructions for any garden chemicals. If a person has specific medical or mobility concerns, they should seek advice from a suitable healthcare professional before taking on tasks that may pose a personal risk.
Source: images.dlf.org.uk
Inspect paths often
Look for cracks, roots, loose paving, slippery growth, pooled water, and other changes that affect traction.
Improve visibility
Add suitable outdoor lighting to entrances, work areas, and places where the level changes.
Store tools securely
Keep sharp blades, chemicals, and heavy equipment in a stable storage area away from the main route.
Reduce strain
Use smaller containers, suitable tools, and rest breaks instead of forcing awkward reaches or heavy lifts.
Prevent Common Accessibility Problems
If the wheelchair gets stuck, first check whether the surface is loose, wet, or uneven. Avoid pushing through a route that may cause a wheel to sink or the chair to tip. Move to a stable area and address the underlying problem before using the route again.
If a raised bed is hard to reach, do not solve the problem by repeatedly leaning farther forward. Reposition the container, reduce the bed’s depth, or adjust the working height after testing the new arrangement. When movement remains uncomfortable, an occupational therapist or rehabilitation professional may help assess reach and task setup.
If a ramp feels too steep or difficult to control, stop using it until its suitability can be assessed. Do not rely on a helper to compensate for a poorly designed ramp. A safer route may require a longer ramp, a different entrance, or professional changes to the level of the garden.
When paths are difficult to cross
Check the surface, width, slope, and drainage, then repair or replace the problem area.
When plants are out of reach
Move them closer, use a suitable tool, or adjust the bed design instead of overreaching.
When access feels unsafe
Stop using the hazardous feature and seek qualified help to review the design.
9. Plan an Accessible Garden on a Budget
You can improve wheelchair access without changing every part of the yard at once. Begin with the route the gardener uses most, then make one growing area easy to reach. Smaller projects also let you test materials and heights before committing to permanent construction.
A simple garden can use containers, a sturdy table, accessible storage, and a short firm path from the patio. Reusing suitable containers or building a modest raised bed may cost less than a full landscape renovation. However, low-cost materials are not always economical if they require frequent repairs or make the garden difficult to use.
Get written estimates for major paving, drainage, ramp, or structural work. Compare what each estimate includes, such as site preparation, materials, disposal, drainage, and future maintenance. Ask about local building rules and whether a permit or inspection is required before construction begins.
Community gardens, local disability organizations, gardening groups, and cooperative extension services may provide useful advice or help identify local resources. Availability varies by location, so confirm the services and eligibility rules directly rather than assuming that a particular program exists in every community.
Source: i.pinimg.com
Start with one accessible bed
Create a manageable planting area close to the entrance and expand only after testing how well it works.
Reuse suitable materials
Repurpose sturdy containers or furniture when they are stable, weather-resistant, and appropriate for outdoor use.
Compare total costs
Include installation, drainage, repairs, watering equipment, and long-term upkeep when comparing options.
Seek local advice
Contact extension services, disability groups, or community gardening programs to ask about guidance and available assistance.
A Practical Order for Making Improvements
A staged plan helps direct money toward the changes that matter most. The exact order depends on the garden, but access should come before decorative features. A beautiful raised bed will not help much if the gardener cannot safely reach it.
After the main route and entrance work well, add the first planting area and a convenient water source. Test these features during normal gardening tasks. Use what you learn to decide whether the next investment should be a wider path, a second bed, more storage, or improved shade.
Stage one
Clear the route, address major hazards, and improve the entrance.
Stage two
Install one reachable bed or container area with convenient watering access.
Stage three
Add storage, seating, lighting, and further planting areas based on actual use.
10. Test the Layout Before You Build
A practical test can reveal problems that measurements alone may miss. Mark the proposed path and bed locations with removable tape, chalk, or temporary markers. Use the intended wheelchair to travel from the entrance to the growing area, approach the bed, turn around, reach the plants, and return to the starting point.
Repeat the test with the tools and containers the gardener plans to use. A route that works without a watering can or harvest basket may feel cramped when these items are added. Check whether the gardener can stop beside the bed, reach the main planting area, and place harvested produce on a nearby surface.
Test the layout under realistic conditions when it is safe to do so. A path may behave differently after rain, and sunlight may make an exposed work area uncomfortable at certain times of day. Do not deliberately test a hazardous slope or ramp; have questionable access features assessed by a qualified professional.
Ask the gardener to identify the most tiring or awkward movements. Change one feature at a time, then repeat the task. This helps reveal whether a wider turn, lower shelf, different bed depth, or closer water source makes a meaningful difference.
Source: i.pinimg.com
Test the whole route
Travel from the usual starting point to every essential garden feature and back.
Test real tasks
Try planting, watering, harvesting, and storing tools with the intended equipment.
Check independence
Identify tasks that still require help and consider whether a design change could reduce that need.
Review after installation
Inspect the completed garden during regular use and adjust features that remain awkward or unsafe.
Signs That Your Accessible Garden Is Working
A successful garden lets the user reach the areas they want to enjoy without repeated detours or unnecessary assistance. The wheelchair can travel over the intended paths, approach the beds, and turn in the planned spaces without contacting obstacles.
Routine tasks should feel manageable with the tools and supports chosen for the gardener. If watering, harvesting, or storing supplies still requires excessive reaching, heavy lifting, or awkward turning, treat that as a design issue to solve rather than a personal failure.
Comfortable movement
The wheelchair can enter, travel, stop, and turn along the main routes without avoidable obstacles.
Reachable plants and supplies
The gardener can access intended plants, tools, and water controls from a stable position.
Reliable surfaces
Paths remain firm, drain well, and receive regular maintenance.
Enjoyable daily use
The garden supports the user’s preferred activities without adding unnecessary work or discomfort.
11. Evidence-Based Planning and Useful Next Questions
The most useful design choices are those that respond to real movement needs, sound construction, and the conditions at the site. Accessibility guidance can provide technical reference points, but the final layout must also account for the intended user and the type of property. A path width or bed height should never be treated as universally suitable without considering how the gardener will use it.
For a U.S. project, the ADA Standards for Accessible Design are a primary reference for covered facilities and applicable accessible routes. The U.S. Access Board also provides technical guidance on accessible design. Local building departments can explain relevant permits and codes, while an occupational therapist or rehabilitation professional can help assess individual reach and task needs.
The garden should also reflect the local growing environment. University cooperative extension services can help identify plants suited to regional temperatures, soil, sunlight, pests, and water availability. This guidance is particularly useful when selecting native plants or planning a vegetable garden for a specific growing season.
A useful way to move forward is to write down the three biggest barriers, choose the most important gardening activity, and plan one practical improvement. After the first change, test the route and the task again before expanding the project.
Source: placerrcd.org
Accessibility guidance
Consult the U.S. Access Board and applicable ADA resources for relevant technical information, while confirming which requirements apply to the specific site.
Construction advice
Contact local building officials or a qualified contractor for major ramps, drainage changes, structural work, and permit questions.
Individual task assessment
Consider an occupational therapist or rehabilitation professional if reach, positioning, grip, or transfers make gardening difficult.
Regional plant advice
Use a local university cooperative extension service to select plants and plan seasonal care for the garden’s climate.
A Compact Garden Planning Checklist
Before purchasing materials, confirm that the plan covers movement, growing, watering, and maintenance. A short checklist can prevent expensive changes later and help family members, contractors, or volunteers understand the priorities.
Access
The entrance, route, turning spaces, and work areas have been measured and tested.
Growing space
Beds, containers, and work surfaces match the gardener’s seated reach and preferred activities.
Water and storage
Frequently used tools, water controls, and supplies are convenient to reach.
Safety
Drainage, lighting, surface stability, ramp design, and equipment storage have been considered.
Maintenance
The chosen materials and plants can be maintained with the time, resources, and help available.
Frequently Asked Questions
Q
What is the best surface for a wheelchair accessible garden path?
A firm, stable, slip-resistant surface that drains well is usually the most useful starting point. Properly installed concrete, asphalt, suitable pavers, and well-compacted fine stone may work, depending on local conditions and the wheelchair. Avoid loose gravel, deep bark, and uneven stepping stones when they make movement difficult. Test the surface and plan for routine maintenance.
Q
How high should a raised garden bed be for a wheelchair user?
The right height depends on the gardener’s seated position, arm reach, wheelchair design, and ability to lean forward. Test a sample height before building the bed. A shallow bed with open space underneath may improve access for some users, while containers placed on a stable table may work better for others. Keep the bed narrow enough to reach the plants without straining.
Q
Can I make an existing garden wheelchair accessible without rebuilding it?
Yes. Many gardens can be improved in stages. Start by clearing the route, fixing uneven surfaces, making the entrance easier to use, and adding a reachable container or raised bed. Improve watering and tool storage next. Major slopes, structural changes, and unsafe ramps may need professional assessment.
Q
How wide should a wheelchair accessible garden path be?
The width depends on the wheelchair, the route, and the movements needed at turns and entrances. The ADA standards commonly use a 36-inch minimum clear width for many accessible walking surfaces, subject to specific conditions. That figure is a reference rather than a universal guarantee for private garden use. Wider paths and turning areas may be more comfortable, especially when a helper or another visitor needs room.
Q
Which plants are easiest to grow in an accessible garden?
Herbs, compact vegetables, and suitable container plants can be good starting points because they can be placed within comfortable reach. Examples include parsley, chives, lettuce, radishes, and compact tomato varieties when the local climate and growing conditions suit them. Choose plants based on sunlight, water needs, maintenance, and regional planting guidance rather than assuming one list works everywhere.
Q
Do I need a permit to build a wheelchair accessible garden ramp?
Permit requirements depend on the property, the type of construction, local building codes, and the ramp’s location and size. Before building a permanent ramp or changing a deck, porch, retaining wall, or entrance, contact the local building department. A qualified contractor or accessibility professional can help determine the appropriate design and requirements.
Q
How can I make gardening easier for someone with limited hand strength?
Try lightweight tools with comfortable grips, easy-to-operate watering controls, and containers that do not require heavy lifting. Drip irrigation can reduce the need to carry water, and reachable shelves can limit repeated handling. Test individual tools before buying them, since grip size, weight, and control needs vary from person to person.
✦ Wrapping Up
Conclusion
Learning how to make a wheelchair accessible garden starts with understanding the gardener’s needs and removing the barriers that make outdoor spaces hard to use. Firm paths, suitable turning areas, reachable raised beds, safe entrances, and convenient water access can make a major difference. Thoughtful plant choices, stable furniture, and well-placed tools can also reduce effort and help the gardener enjoy the space.
The most effective design is one that fits the actual wheelchair, the available space, and the activities the gardener values. You do not need to add every feature at once. Begin with the route and the main growing area, test the layout, and make further improvements as needs become clear. For major ramps, structural work, or uncertain safety issues, seek qualified professional guidance.
💡 Key Takeaway
Measure the main route, identify the three biggest access barriers, and choose one high-impact improvement. Test the entrance, path, and planting area with the intended wheelchair before committing to permanent construction.
Learn how to sterilize gardening tools with safe cleaning methods, effective disinfectants, step-by-step instructions, and tips to prevent plant diseases.